Thursday, October 28, 2010

Roasted Pumpkin Seeds ~ Anxiety Ridden Pumpkin Carving


For me...carving pumpkins does not come without anxiety.  It stems back many years...decades really. 

You see, both my sisters are amazing artists.  When we were little girls and carving night arrived, the two of them (like a pretty pair of Edward Scissorhands) would sculpt the perfect Jack O'Lanterns... blue ribbon worthy and chock full of, "spooky personality!"

Before I could even carve my first pumpkin eye, their masterpieces would be prominently displayed on each side of the front door... drawing accolades and praise from neighbors, family and friends.  (Martha Stewart ringing for their secrets.)

Sadly, my pumpkin ended up sitting in the backyard...alone...partially covered by branches and leaves...its eyes, nose and mouth difficult to decipher.

Sigh. 

The funniest thing is, there's actually a picture of me when I was little, sitting on our front porch proudly clutching (right smack in my lap) one of my sisters' masterpiece pumpkins!  I recall (in that little girl head of mine) thinking, "history will be blurred here!  Everyone will believe this pumpkin is/was... mine... MINE... ....MINE!!!"

What I didn't realize was that my f'UGLY pumpkin sat clear as day in the background - the sun hitting its face just so - as to make it the focal point of the whole entire photo!  (Not the adorable little...ARTISTICALLY GIFTED...blond girl rocking bouncy, beautiful pigtails!)  

Double Sigh, Foot Stomp!

So anyway...here's the Jack O'Lantern my daughter and I carved today. Despite its odd mouth (something went awry) I think I've come a long way.


P.S.: my husband (who is not feeling well) carved his pumpkin tonight too (after we did ours) and my darling daughter exclaimed, "Look Mommy! Daddy carved a "real" Jack O'lantern! The kind I've always wanted...with the squiggly mouth!"

Kick me while I'm down why don't you.


Here are the seeds we roasted. Happy Halloween!
Roasted Pumpkin Seeds

Seeds from 1 large pumpkin (1-1/2 cups)
Spices ~ Here I used a similar spice mix I like to use on roasted chickpeas...salt, garam marsala, touch of garlic powder, chili powder and bit of cinnamon.

Directions:
Preheat oven to 350.

Rinse, clean and dab dry the pumpkin seeds.

Spray roasting pan with non-stick cooking spray.

Sprinkle seeds with salt and/or spices of your choice.

Place seasoned seeds in a single layer in pan.

Roast seeds for about 15 minutes, shaking once during cooking.

Let cool before eating - they're better when at room temp! Crunchy, salty, sweet!

They were a HUGE hit! 

Wednesday, October 27, 2010

Split Pea Soup with Bacon ~ The Smokin' Hot Librarian


This homemade Split Pea Soup with Bacon reminds me of the character, "The Smokin' Hot Librarian." 

You know the one in movies and on TV who seems initially unattractive...

The nerdy, book loving woman with pinned back hair, knee length skirt and freshly sharpened pencil tucked behind her ear...

The one who five minutes into the show is tossing her horn rimmed glasses, loosening the buttons at the top of her shirt and carelessly releasing her uptight, trademark bun...

With generous chunks of rendered down, smoky, uncured bacon and the love you'll put into each and every stir...one spoonful is all you'll need to appreciate this seemingly mundane soups... undeniable sex appeal!

Split Pea Soup with Bacon, my own adapted over time *you could easily 1/2 this recipe - this makes a ton!

1 lb dried split peas (picked over to remove tiny rocks etc, soaked overnight in cold water)
1/2 pound (+) really good, quality smoked bacon, chopped
2 carrots, diced
2 celery stalks, diced
2 cups of onion, chopped
4 cloves of garlic, minced
2 bay leaves
1 heaping tsp cumin
8 cups chicken stock
kosher salt and fresh cracked pepper to taste

Drain and rinse peas. In large stockpot, render down bacon, about 5 minutes. Remove bacon and place in bowl, set aside. (Drain bacon on paper towels if it's especially greasy.) Also carefully remove some bacon grease from the bottom of the pot only if you're left with LOTS of grease. The bacon I used was not especially fatty so I skipped this step.

Add onion and garlic to the pot and saute up in the bacon grease until soft, about 4-5 minutes.  Add the carrot and celery and cook, folding together, about 4 minutes. Add cumin and stir for 1-2 minutes. Add peas and stir until well incorporated. Add bay leaves and chicken stock and bring to a boil over medium heat, stirring occasionally.

Once boiling, turn down heat to a simmer, cover and cook until peas have "busted open" about 45 minutes to an hour. Soup should look like it was Braun'ed.

Turn off the heat, find and discard bay leaves, stir in the sexy bacon.

Salt and pepper to taste and enjoy!

Tuesday, October 26, 2010

Irish Whiskey Cake ~ Pat's Recipe


It's recipes like this next one that inspire me to bake. This is actually an old photo from last December (before I started this blog), but I thought it timely to share with you now - well before holiday baking is vigorously underway!

Just as styles change from year to year, so too has the Irish Whiskey Cake's form. Initially a bundt cake... it's been served as a flat layer cake... cupcakes... mini cupcakes... I think I recall scones one year... large loaves... medium loaves... and most recently (and most popular I might add...) the small loaf form seen here.

The recipe appears in a cookbook assembled some 30+ years ago for The Lady Of Lords Hospital in Camden, NJ. It was an old family recipe submitted by Pat Friedman, a dear friend of my mothers who passed away soon after gifting the book.

This time of year my mom makes Pat's Irish Whiskey Cake in bulk - because wrapped beautifully - they make a wonderful gift!  Perfect with a hot cup of coffee or tea, the cake freezes well and is nice to have on hand anytime of year!

The Irish Whiskey Cake is special to my family, was special to Pat and there's no question she'd be happy... I'm sharing her recipe with you!

Thanks for reading and I hope you enjoy!

Irish Whiskey Cake

1 lb. Butter
2 cups sugar
6 eggs separated
¾ cup whiskey
4 cups flour
3 cups chopped pecans
1 lb. Golden raisins
Cinnamon or nutmeg

Cream butter and sugar. Add beaten egg yolks. Stir in whiskey alternately with sifted flour beating as you do. Fold in beaten egg whites . Stir in pecans and raisins. Sprinkle in cinnamon or nutmeg to taste. Bake at 250 degrees for 3 hours in a tube pan. Seal in airtight container in preparation for Christmas. Optional - Sprinkle with confectioners sugar when served.

(*These small loafs I made took 2 hours, 15 minutes to bake. Nice hot out of the oven, but delicious as is sits. Whiskey flavor intensifies with time!)

Monday, October 25, 2010

Just Checking In...

Between birthdays, traveling, doctors offices and life...I've barely been on this computer all week! I'm officially worn out but thought I'd check-in.

I have a pound of mini black beans soaking in water for tonight's dinner and a perfectly ripe, large haas avocado - I'm thinking vegetarian burritos smothered in cheese ...and pumpkin carving if time allows!

While away this weekend, I snuck off and snapped this photo. It was a peaceful five minutes I had all to myself. It was sunny, cool and quiet...all I could hear was the humming of that boat's engine off in the distance.

Be back soon...I have some catching up to do for sure!

Tuesday, October 19, 2010

Moroccan Spiced Chickpea Soup ~ Common Law or Hostage Situation?


This time of year, I tend to get carried away with "Braun" ...my emulsion blender.  I don't know if it's the hand held power to pulverize anything in sight or the fact that when it's turned on, its motor silences my children...but ever since being introduced to "Braun" back in the late 90's...I've always considered it... a must have kitchen tool!


Funny thing is, there's some question as to who rightfully owns Braun. My sister left the emulsion blender in our New York City apartment back in 1999...so as far as I'm concerned...a decade plus later...my relationship with Braun is one of "legal common law."

My sister on the other hand, likes to refer to Braun's existence in my home as a "hostage situation" ...noting every time she comes to visit, Braun mysteriously disappears?


Anyway on to the food...

Dave's recipe does not call for this Moroccan Spiced Chickpea Soup to be completely pureed, but when the soup was finished cooking... hot and ready to eat...I knew Braun would want in on the action! So I grabbed found Braun behind one of our living room pillows... and got straight to blending!

"Braun'ed" or not "Braun'ed"...serve this Moroccan Spiced Chickpea Soup with crusty bread for a delicious vegetarian weeknight meal  ...or... in smaller portions for a fun and festive start to a Moroccan themed dinner party!

It won't disappoint!

now if you'll excuse me...I have Braun...(and a sweater I think) I need to go and hide.

Moroccan Spiced Chickpea Soup
Recipe courtesy Dave Lieberman, foodnetwork.com

1/4 cup extra-virgin olive oil, plus more for garnish (I used less)
1 large onion, medium diced
6 to 8 cloves garlic, pressed
1 teaspoon ground cinnamon
1 teaspoon ground cumin
1/8 teaspoon cayenne pepper
1 heaping teaspoon sweet paprika (I used hot paprika -gave it a kick for sure!!)
1 (14.5-ounce) can chopped tomatoes
3 (15-ounce) cans chickpeas, drained and rinsed well
1 quart vegetable broth or reduced-sodium chicken broth
1 teaspoon sugar
Kosher salt
Freshly ground black pepper
1 (5-ounce) package pre-washed baby spinach

Directions

Heat olive oil in a large pot over medium-high heat. Add onion and garlic and saute until the onions begin to turn translucent; lower heat if browning starts to occur. Add spices and saute a minute or so. Add tomatoes, chickpeas, broth, and sugar. Season with a couple pinches of salt and 10 grinds fresh pepper. Stir well. Chickpeas should be just covered with liquid. If level is shy, add some water so the chickpeas are just covered.

Bring to a simmer, then lower heat to low and gently simmer for 45 minutes. Remove soup from heat. Use a potato masher to mash up some of the chickpeas right in the pot. (I used the emulsion blender and pured the entire soup, including the spinach) Stir in the spinach and let heat through until wilted, just a couple minutes. Season again, to taste, with salt and pepper.  Serve soup, drizzled lightly with extra-virgin olive oil, if desired.

Sunday, October 17, 2010

Simple Cream of Crab Soup

Simple Cream of Crab Soup

I made this simple Cream of Crab Soup on Friday afternoon with the intention of serving it as a first course to our Braised Beef Short Ribs. After giving it more thought, I determined the soup was way too rich and delicious to precede an equally decadent dinner!

Plan B - Sunday Game Day!

The weekend festivities continue!  This Crab Soup has found its way to our game day spread!

May all your teams win today...unless they're playing one of mine! ;)

Simple Cream of Crab Soup


1 lb. crab meat, picked of shells (here I used Claw Meat as it's way easier on the wallet!)
1 shallot, finely diced
1 celery stalk, finely diced
1/2 stick butter
1/3 cup flour
8 oz. clam juice
1 cup light cream
1 cup 1% milk (*plus 2 cups 1% milk)
1 tsp. Old Bay
1/2 tsp. fresh chopped thyme

In heavy stock pot over medium heat, melt butter. Add shallot and celery. Saute up until soft, about 4-5 minutes. Add flour and whisk into a roux. Add clam juice, light cream and milk. Whisk until well mixed. Add Old Bay and chopped thyme. Whisk over heat until hot. Add crab meat and fold soup together. Salt and Pepper to taste. Serve hot.

*I refrigerated the soup on Friday and then added approximately 2 more cups milk to thin out the soup before heating it up today. So, so good!!!!

Saturday, October 16, 2010

Braised Beef Short Ribs ~ A Birthday Eve Dinner!

It's my husband's birthday today and we're super busy - but I couldn't wait to share with you the Braised Beef Short Ribs I made for him last night. After contemplating long and hard over which recipe to use (based on the positive reviews online) I settled on Chef Anne Burrell's.

We enjoyed the Beef Short Ribs over top of steaming hot parmesan polenta and served prosciutto wrapped figs and goat cheese on the side. Unbelievably rich and comforting...the meal was one of the best we've had in a long, long time!

Here, I am enjoying one again for lunch before we head out for our day.  This rib will have to ride solo though - as that polenta is long gone!  Too bad too... because last night...all plated up... these Braised Beef Short Ribs were visually stunning!

*I noted a few things down below you may want to consider if using this recipe. Time was about 3 hours. My photos here do not do these braised Beef Short Ribs justice!

Braised Beef Short Ribs
Recipe courtesy Anne Burrell, foodnetwork.com

6 bone-in short ribs (about 5 3/4 pounds)
Kosher salt
Extra-virgin olive oil
1 large Spanish onion, cut into 1/2-inch pieces
2 ribs celery, cut into 1/2-inch pieces
2 carrots, peeled, cut in 1/2 lengthwise, then cut into 1/2-inch pieces
2 cloves garlic, smashed
1 1/2 cups tomato paste (maybe closer to 1 cup next time?)
2 to 3 cups hearty red wine
2 cups water (we used beef stock)
1 bunch fresh thyme, tied with kitchen string
2 bay leaves

Directions
Season each short rib generously with salt. Coat a pot large enough to accommodate all the meat and vegetables with olive oil and bring to a high heat. Add the short ribs to the pan and brown very well, about 2 to 3 minutes per side. Do not overcrowd pan. Cook in batches, if necessary.

Preheat the oven to 375 degrees F.  (We cooked ours at 325)

While the short ribs are browning, puree all the vegetables and garlic in the food processor until it forms a coarse paste. When the short ribs are very brown on all sides, remove them from the pan. Drain the fat, coat the bottom of same pan with fresh oil and add the pureed vegetables. Season the vegetables generously with salt and brown until they are very dark and a crud has formed on the bottom of the pan, approximately 5 to 7 minutes. Scrape the crud and let it reform. Scrape the crud again and add the tomato paste. Brown the tomato paste for 4 to 5 minutes. Add the wine and scrape the bottom of the pan. Lower the heat if things start to burn. Reduce the mixture by half.

Return the short ribs to the pan and add 2 cups water or until the water has just about covered the meat. Add the thyme bundle and bay leaves. Cover the pan and place in the preheated oven for 3 hours. Check periodically during the cooking process and add more water, if needed. Turn the ribs over halfway through the cooking time. Remove the lid during the last 20 minutes of cooking to let things get nice and brown and to let the sauce reduce. When done the meat should be very tender but not falling apart. Serve with the braising liquid.

Wednesday, October 13, 2010

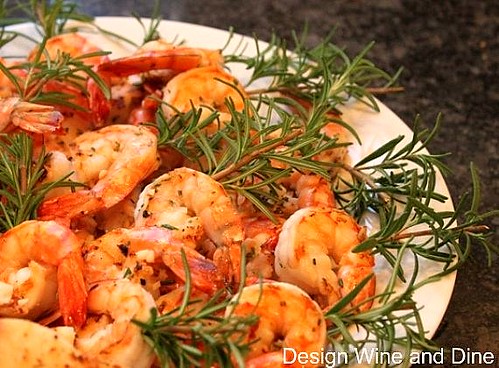
Garlic Rosemary Shrimp ~ Rosemary's Baby

Garlic Rosemary Shrimp


She's been with us for years...arriving well before the children.

In the spring, she wasn't looking so good....she was all dried out and rangy. I remember my husband and I looking at her...sadly knowing... her days were surly numbered...

"It was a good ride..."

"She hung in there for so many years..."

"She never asked questions...never second guessed our intentions with her...she knew her role and she served it well.... with willingness, grace and integrity."

While out shopping for herbs this spring, we picked up her replacement. It was a Baby Rosemary...just wee big...maybe six or seven sprigs.  We could hardly wait to get back home and place that baby plant beside Old Rosemary...in hopes that possibly she would come to know her young...  

...if only for a little while.


Then something miraculous happened!

Old Rosemary began perking up! Her thick, brown, straggly branches changed color - to a deep and glistening green!   Her sprigs were soft...herbaceous... and left behind a distinct oily residue. She was filling in and spreading out... reminiscent of her younger days!

Old Rosemary was BACK!

Maybe it was our 'giving her up for dead' that made her fight? 

Maybe it was the joy of a baby...finally by her side? 

Whatever it was... we're thrilled she's still with us today...and so with tonight's dinner...we celebrate her!


Dinner this evening included:

Garlic Rosemary Shrimp
Garlic Rosemary and Feta Flat bread (I made with store bought pizza dough)

Garlic Rosemary Shrimp
adapted from recipes off the web

1 lb medium shrimp, peeled and deveined
1 tsp. chopped rosemary, very finely chopped
2 T garlic, finely chopped
1-2 T. olive oil
Pinch of salt and pepper

Place all ingredients in Ziploc bag and marinate at least 30 minutes. Saute up in a hot grill pan, about 1-2 minutes per side, or until shrimp is opaque.

Here I served it with 2 inch pieces of rosemary acting as toothpicks or skewers (saw this on epicurious.com). Also garnished with lemon wedges and served slices of flat bread and soup along side.

Monday, October 11, 2010

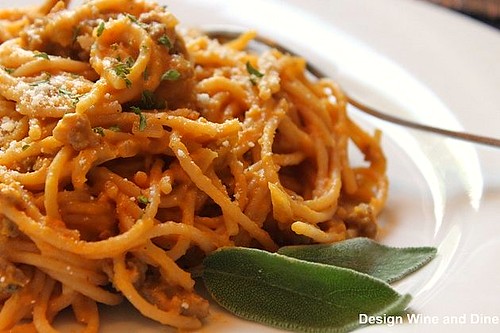
Whole Grain Pasta with Sage Sausage and a Pumpkin Sage Cream Sauce ~ Hornswoggled!

Pumpkin Sage Pasta

Has the whole world gone MAD with pumpkin fever?!

I ran to the grocery store on Saturday afternoon, simply to "grab a few things" and...

OK... before proceeding I have to come clean...

"Grab a few things" in my world translates,  "I need a break from these children and so I'll be 'right back' with the basics we desperately need to survive!"  Milk, eggs, bread, butter...etc....

My sense of urgency and willingness to, "head to the store, for the sake of our family's well being"  leaves my husband appreciative...at first.

When he realizes (well after I'm gone) ...we have 3/4 gallon of milk, a loaf of bread, five sticks of butter, ten eggs and there's a suspicious odor wafting from our son.... it's clear he's been HORNSWOGGLED...left behind with two wide-eyed, attention seeking children! 

One...who wants Daddy's full participation in a puppet princess tea party... and the other... in desperate need of a CODE RED diaper change!  With College GameDay featured in the background... it's a father's perfect storm!

By the time my "little escapade" comes to light...it's too late!  I'm already leisurely strolling down the produce aisle with the next issue of Bon Appetite... my cell phone ringer 'mysteriously' placed on silent.

I might as well be at the spa...that's how much I enjoy grocery shopping...alone!

Which brings me back to PUMPKIN.

While out the other day I noticed EVERYTHING is flavored with the popular gourd ....pumpkin cream cheese, pumpkin coffee, pumpkin bagels, pumpkin flavored crackers?! I decided to ride the wave (once again) and make this, Whole Grain Pasta with Sage Sausage and a Pumpkin Sage Cream Sauce. 

The dinner was amazing!

My sister picked up the recipe from one of her friends in her Book Club (who adapted the recipe from Rachael Ray).  I compared the recipes and loved her changes!

I made a few changes too... and let's just say this Pumpkin Sage Sausage Pasta (along with a six-pack of pumpkin flavored beer) more than made up for my sneaky escape!

Whole Grain Pasta with Sage Sausage and a Pumpkin Sage Cream Sauce

Adapted from "Pumpkin Sage Pasta"...a Rachael Ray Recipe

6 sweet sausage links, cut into 1 inch pieces (I used Jimmy Dean Ground Sage Sausage, 16 ounces)
1/2 - 1 onion, diced
10+ springs sage - chopped lengthwise
3-5 garlic cloves, diced
1 c. dry white wine
1 bay leaf (if you have!)
1 15 oz. can pumpkin
1/4 c chicken broth
pinch of cinnamon and nutmeg
1/4 c light cream (I used heavy as it was all we had)
3/4 lb penne pasta - with grooves (I used Barilla Whole Grain Spaghetti)
Salt and Pepper to taste
Freshly shaved or grated Parmesan cheese on top (optional)
What about toasted pine nuts on top??? (thought about it, but didn't do it - might be awesome!)

DIRECTIONS:
Make pasta according to package directions. Brown sausage and drain. In same pan (take a paper towel and remove some grease if too greasy) brown garlic and onion, then add the wine. Add pumpkin, chx. stock. Add sausage, sage, spices, incl. pepper. Add cream and stir and keep on low if waiting to serve.

Remove from heat if you have 1/2 hour to go b/f dinner. Before serving, add pasta and stir to coat keeping flame on low. Salt and Pepper to taste if needed. Crushed red pepper flakes if looking for more heat.

Saturday, October 9, 2010

Red Velvet Cake ~ Let the Celebrations Begin!


(Okay....finally! We cut the cake! Scroll down to see... I'll comment on it in comments below!)

My husband's parents just returned back to the states after traveling through Europe and taking a Mediterranean cruise! They're staying with us for one night before heading back home. The brief visit provides the opportunity for us to celebrate with them.... all three birthdays happening this month!

My husband's, my daughter's and my son's, "special day" all fall into the second half of October! (Not to mention our wedding anniversary and Halloween!) So, I can guarantee two things for sure...this is just the first of many celebrations to come and November 1st is sure to find us...a few pounds heavier!

Last night, my husband and I baked this Red Velvet Cake with Cream Cheese Frosting while listening to music and sipping wine.

Arguably the most perfect way to begin any weekend....


Red Velvet Cake, The Joy of Baking

2 1/2 cups (250 grams) sifted cake flour
1/2 teaspoon salt
2 tablespoons (15 grams) regular or Dutch-processed cocoa powder
1/2 cup (113 grams) unsalted butter, at room temperature
1 1/2 cups (300 grams) granulated white sugar
2 large eggs
1 teaspoon pure vanilla extract
1 cup (240 ml) buttermilk
2 tablespoons liquid red food coloring
1 teaspoon white distilled vinegar
1 teaspoon baking soda


Cream Cheese Frosting:

1 - 8 ounce (227 grams) cream cheese, room temperature
1 - 8 ounce (227 grams) tub of Mascarpone cheese, room temperature
1 teaspoon pure vanilla extract
1 cup (115 grams) confectioners' (icing or powdered) sugar, sifted
1 1/2 (360 ml) cups heavy whipping cream


Red Velvet Cake:
Preheat oven to 350 degrees F (175 degrees C) and place rack in center of oven. Butter two - 9 inch (23 cm) round cake pans and line the bottoms of the pans with parchment paper. Set aside.

In a mixing bowl sift together the flour, salt, and cocoa powder. Set aside.

In bowl of your electric mixer, or with a hand mixer, beat the butter until soft (about 1-2 minutes). Add the sugar and beat until light and fluffy (about 2-3 minutes). Add the eggs, one at a time, beating well after each addition. Scrape down the sides of the bowl. Add the vanilla extract and beat until combined.

In a measuring cup whisk the buttermilk with the red food coloring. With the mixer on low speed, alternately add the flour mixture and buttermilk to the butter mixture, in three additions, beginning and ending with the flour.

In a small cup combine the vinegar and baking soda. Allow the mixture to fizz and then quickly fold into the cake batter.

Working quickly, divide the batter evenly between the two prepared pans and smooth the tops with an offset spatula or the back of a spoon. Bake in the preheated oven for approximately 25 - 30 minutes, or until a toothpick inserted in the center of the cakes comes out clean. Cool the cakes in their pans on a wire rack for 10 minutes. Place a wire rack on top of the cake pan and invert, lifting off the pan.

Once the cakes have completely cooled, wrap in plastic and place the cake layers in the refrigerator for at least an hour (or overnight). (This is done to make filling and frosting the cakes easier.)


Cream Cheese Frosting: In the bowl of your electric mixer, or with a hand mixer, beat the cream cheese and mascarpone cheese until smooth. Add the vanilla and confectioners sugar and beat until smooth. Using the whisk attachment, gradually add the heavy cream and whip until the frosting is thick enough to spread. Add more sugar or cream as needed to get the right consistency.


Assemble:
With a serrated knife, cut each cake layer in half, horizontally. You will now have four cake layers. Place one of the cake layers, top of the cake facing down, onto your serving platter. Spread the cake layer with a layer of frosting. Place another layer of cake on top of the frosting and continue to frost and stack the cake layers. Frost the top and sides of the cake. Can garnish the cake with sweetened or unsweetened coconut

Thursday, October 7, 2010

Delicious Pork Tenderloin ~ Blurring the Lines of Recipe Ownership!


Have you ever had one of those recipes that's been passed around so many times ...everyone forgets where it originated?

I've had this Pork Tenderloin in my recipe box for as long as I can remember! I've shared it with so many people over the years (who have then passed it along themselves) that even you are bound to run into this delicious dish at your next neighborhood party!

So... (after forgetting the exact ingredients) you can imagine my dismay when I went to reach for the recipe card...only to find it missing!

Who on earth would take such a thing? I'm extremely too organized to have misplaced it myself? (ha)

Then it dawned on me...I have a pint sized suspect right under my nose!


Culprit is known to illegally acquire crayons to scribble on walls, furniture, books and/or items left unattended.

Culprit is known to steal others possessions to deliberately throw them away in the trash. While this "throwing away" behavior has been deemed by some as "practicing his opening and closing skills"....mom's cute tan flats, dad's Blackberry and sister's teddy bear have all found their way into (and then thankfully out of) the family garbage.
God only knows how many other items have fallen prey to his childish antics.  ...Lego's, bills...a recipe card perhaps?!!!

I had him right at my fingertips!  But after a few minutes of hardcore questioning...his lack of attention and ignorance to the seriousness of the matter at hand... was getting us nowhere!  Having purely circumstantial evidence...I begrudgingly had no other choice, but to let the boy go. (Sigh.)  I was forced to call one of my friends... to ask for my own recipe back. 

She obliged.

But...my fear is now... my friend and I have reached a point with this recipe, where she's confused WHO gave WHO the recipe FIRST?

Will I receive a phone call from her years from now, asking for the pork marinade recipe "she gave me" ...way back when?

Will she show up at our friend's potlucks with trays of succulent pork tenderloin... so that everyone there will go on and on as to, "how amazing her recipe is?"

Will the recipe's lines become so grossly blurred to the point where even I become confused as to WHO had initial rights to the dish?

The vicious cycle will continue and continue....and continue.

So the moral of the story is twofold... keep anything of perceived value out of arms reach of sticky, curious fingers and more importantly... Own  Thy  Recipe! 

Pork Tenderloin Marinade, Unknown - Own it before your friends do!
Makes enough for two medium pork tenderloins.
Best to marinate all day.
Grill to medium.

INGREDIENTS:
1/4 cup soy sauce
3 tablespoons cilantro chopped (optional)
3 tablespoons brown sugar
1 teaspoon cumin
1 teaspoon dried mustard (you can use Dijon if you don't have dried)
1/2 teaspoon paprika
4 teaspoons minced garlic
1/4 cup olive oil

Place both tenderloins in large Ziploc bag along with all the above ingredients. Squish all around to incorporate ingredients and distribute evenly. Refrigerate until about ready to grill! Serve hot, room temp or cold. Delicious on sandwiches, salad or with any number of sides! Wonderful!

Tuesday, October 5, 2010

Red Thai Chicken Curry ~ Handwritten Recipe on Napkin, Jasmine Thai Restaurant, NYC

Red Thai Chicken Curry

In the late 90's my sister and I lived and worked in Manhattan. On Thursday evenings we'd often meet up after work to exchange boss stories and sip chardonnay. Inevitably, we ended up at Jasmine Thai Restaurant on the Upper East Side.

No matter how many times we scoured their menu...admired all the deliciously sounding entrees and 'flirted' with the idea of ordering Pad Thai...it came down to one decision, "we'll have TWO orders of red Thai chicken curry with a side of jasmine rice."  The next few minutes were spent anxiously awaiting our food while commenting on all the beautiful dishes being paraded past our table. We acted as if maybe next time...we'd stray.  But who were we kidding?

One particular Thursday night a mutual friend decided to join us.  As the three of us were escorted to our table, our guest suggested we all order different entrees so to "share and compare" our dinners. 

I FROZE.

The mere thought of someone else's chopsticks awkwardly reaching across the dimly lit table to fumble with my curry...sent shivers up my spine! I was certain my sister felt exactly the same! 

Somehow...we talked our way out of it!  After all...we weren't there to, "try new things" or "expand our culinary palates"...we were there for the curry!  From that night on any possible 'third parties' were carefully scrutinized and unknowingly subjected to a rigorous ten-point checklist...all to determine their "joining us out for Thai food eligibility."  

Sadly...it was often just the two of us.

One night we mustered up the strength to ask for the recipe. After a few painful attempts at some type of meaningful dialog with our waiter (as we were preparing to leave) he graciously returned with a napkin.  There were words on it... mostly in English...some symbols in Thai.  We did our best to translate.

Here's the DELICIOUS Red Thai Chicken Curry recipe we've been enjoying ever since! Thanks Jasmine!

You'll need a spoon AND chopsticks for this!

RED THAI CHICKEN CURRY
Jasmine Thai Restaurant, NYC, late 90's recipe on napkin, or as close as we could get!

2 cans of coconut milk
1/2 can water* (we use chicken stock)
1 jar of red curry (You don't have to use the whole jar!  Depending on the brand you use...use as much or as little as your taste determines. 2 heaping teaspoons is usually good for very spicy if using Thai Kitchen Brand, which is widely available.)
2 tablespoons of sugar (we use brown sugar)
2 tablespoons of fish sauce
1/2-1 cup of fresh, chopped basil (prefer Thai basil but any will do)
1 red, green and/or yellow pepper (sliced into strips)
1 small -medium size eggplant (optional) (sliced into strips)
1 onion (sliced into strips)
4 to 5 chicken breasts (sliced into strips) (we like to salt and pepper our chicken before cooking)
Olive oil

DIRECTIONS:
Saute the chicken strips in approx. 2 tablespoons of olive oil until lightly browned (par cooked). Set aside. In same pan, add the vegetables and continue to saute in olive oil (add more if necessary) until slightly softened, but not limp. Set aside.

In a large pot, combine coconut milk, water*, curry, fish sauce and sugar and whisk together. Simmer until combined. (Taste and add more curry if looking for more heat.) Add chicken and veggie mixture and allow to heat together for a few minutes or until chicken is cooked through. Stir in basil right before serving. Serve over jasmine** rice.

**We buy jasmine rice at the grocery store (Carolina Brand is easy to find and very good) or Asian market and often cook in the microwave. According to the Carolina brand rice recipe cook: 1 cup rice to 1 3/4 cup water. Cover and place in microwave on high for 5 mins. Reduce power setting to 50% and cook an additional 10 minutes. Let sit 5 minutes and it's ready! Simple way to prepare and perfect every time!

2-4 servings. (Not shown in photos: side of Jasmine rice - but don't you FORGET it!)

Monday, October 4, 2010

Skirt Steak with Spinach Cilantro Oil and Pico De Gallo ~ A Rainy Monday


After a long weekend of festivals, pony rides, a beer tasting party and an open house... Monday night's dinner (and blog post) had to be simple.  This is the one and only photo I snapped of my dish... before thoroughly enjoying it with a side of piping hot black beans! 

Full of flavor and perfect for this cold, rainy night!

Skirt Steak with Spinach Cilantro Oil and Pico de Gallo


INGREDIENTS:
1 lb Skirt Steak
Garlic powder
Onion powder
Cumin powder
Chili powder
Paprika
Kosher salt and fresh cracked pepper

DIRECTIONS
Early in the day or at least an hour before, sprinkle the meat on both sides with salt, pepper, garlic powder, onion powder, cumin, chili powder and paprika. Place the meat in a plastic Ziploc bag and refrigerate meat in the dry rub until ready to cook. (sorry no exact measurements here.)

Place oven rack on top tier. Preheat broiler to high. Place meat on broil pan (we cover the top of ours with aluminum foil and cut slits where the slits fall naturally on the plan - this makes clean-up easier.) Spray the pan or aluminum foil with cooking spray. Cook meat under the broiler about 2-3 minutes per side.

Remove from oven and let meat rest a few minutes. Slice on a diagonal against the grain.

Spinach Cilantro Oil
Loosely based off of an Emeril Lagasse Recipe

Baby Spinach, about 2-3 large handfuls
Cilantro, about 1 large handful
olive oil
pinch of salt
pinch of paprika

Prepare ice bath in medium size bowl.  Place a few cups water in pan and bring to a boil. Place 2-3 large handfuls of baby spinach and 1 large handful of cilantro leaves in the water for 30 seconds - 1 minute. Remove greens from boiling water and place in ice bath to stop cooking. Dry greens best you can between paper towels and squeezing.  Place greens in small food processor with a pinch of salt and cayenne pepper or paprika. Add olive oil to the top of the processor in a slow steady stream to desired consistency.

Here's the Pico De Gallo recipe - what made it even easier - we made the Pico de Gallo on Sunday!

Sunday, October 3, 2010

Photos from the Pumpkin Farm - PROOF!

Today's post...proof that The Competitive Pumpkin Picking Story was not made up!

Gives me chills!

The Starting Line!

Pumpkins on the horizon...


I'm trying my best Mom!


Hmmm, that one over there looks nice too...

I'm cold and tired but can't give up!

Stay the course, stay the course! Potty breaks are for the weak! Thank goodness for diapers!